- Have any questions?
- 9810101913
- info@wetfitaquagym.com
Shop


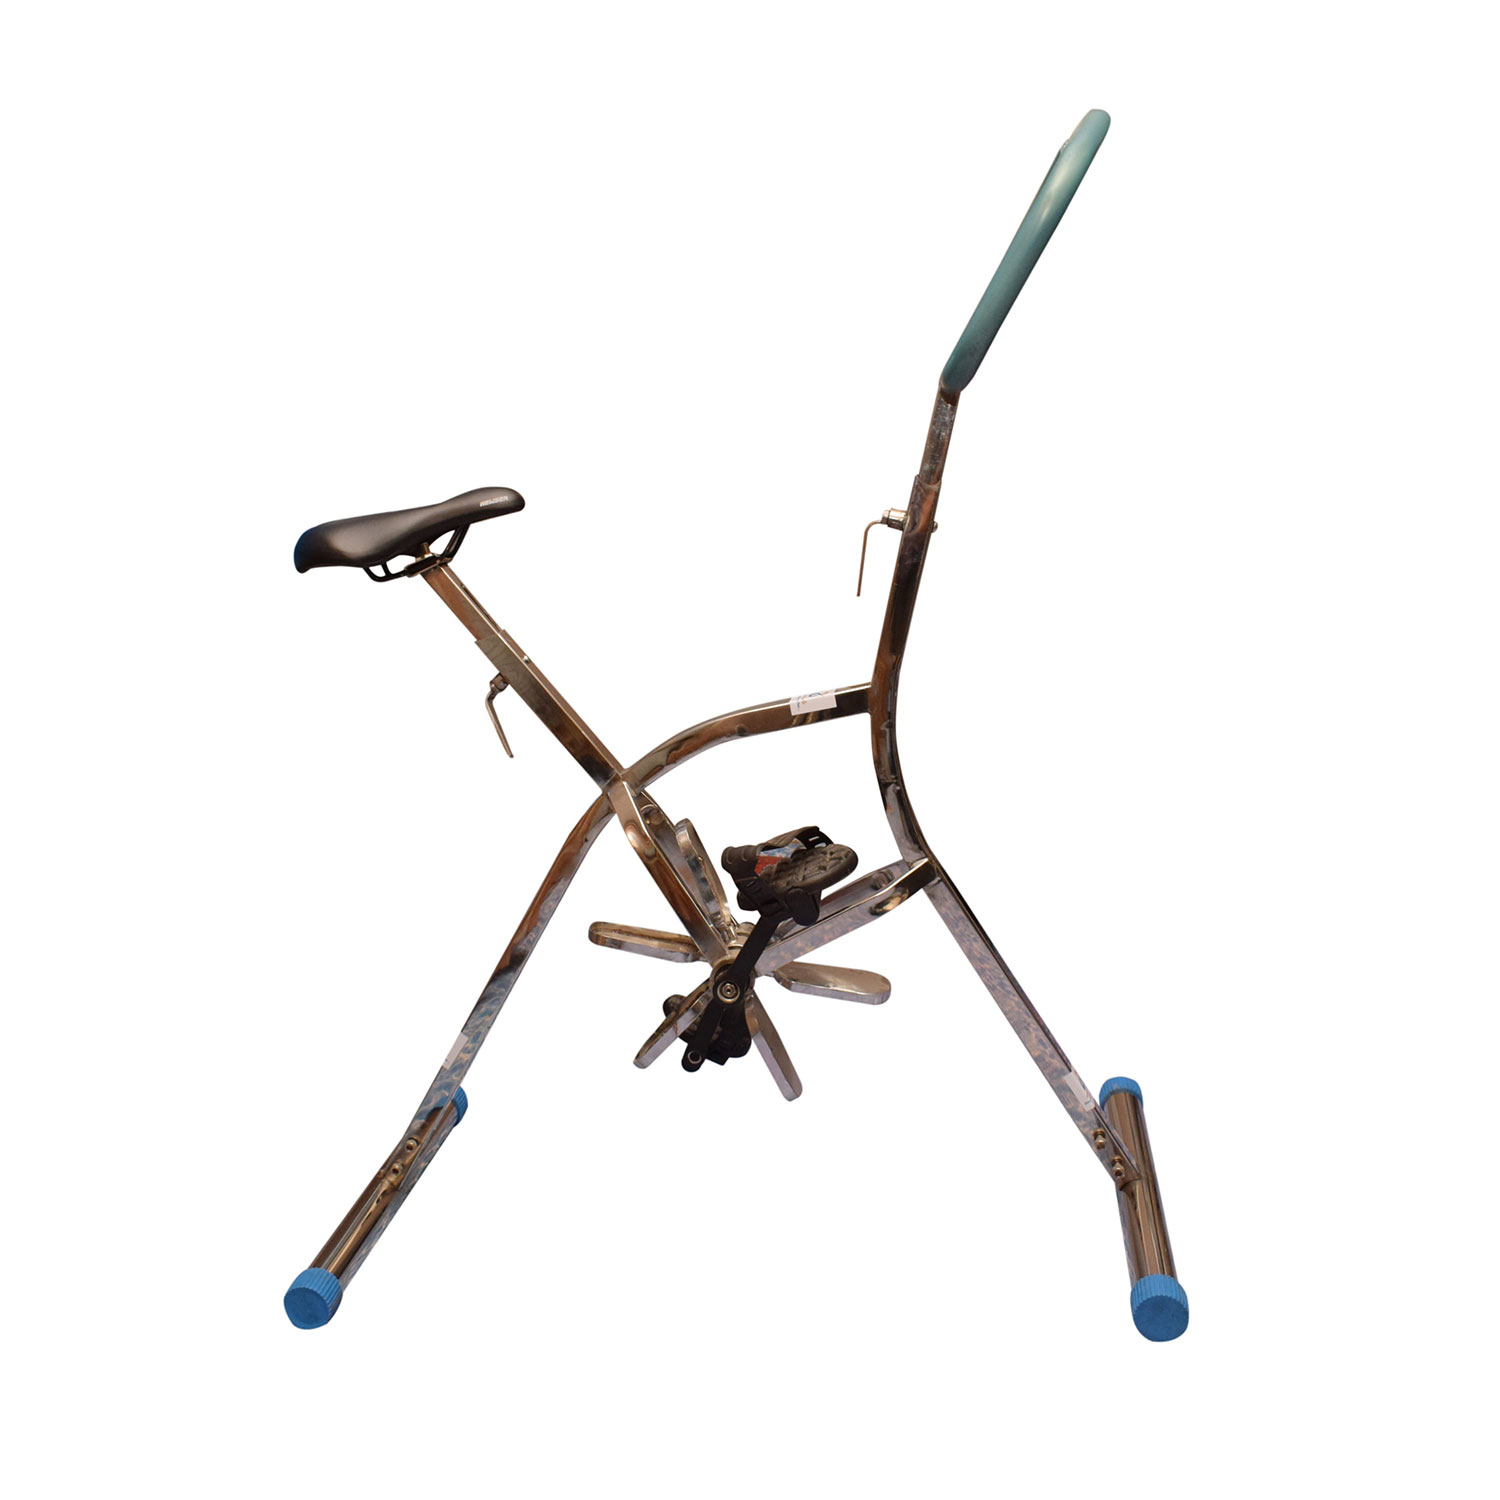
AQUA BIKE
1. IMPORTANT SAFETY INFORMATION
READ ALL INSTRUCTION BEFORE USING
THIS OWNER’S MANUAL CONTAINS ASSEMBLY, OPERATION, MAINTENANCE AND SAFETY INFORMATION. IN THE INTERST OF SAFETY, PLEASE MAKE CERTAIN THAT YOU READ AND UNDERSTAND ALL THE INFORMATIONS BELOW.
IMPORTANT SAFETY PRECAUTIONS
- Read the OWNER’S MANUAL and all accompanying literature, and follow it carefully before using your AQUA BIKE.
- Inspect your AQUA BIKE prior to exercising to ensure that all nuts and bolts are fully tightened before each use. We recommend checking the conditions of the machine periodically if necessary change the parts before they are totally consumed.
- Most exercise equipment is not recommended for small children. Children should not use the machine unless they are under adult supervision.
- AQUA BIKE has moving parts. In the interest of safety, keep others, especially children, at a safe distance while exercising.
- We recommend that you warm up 5 to 10 minutes before each workout and cool down 5 to 10 minutes afterward.
- Breathing should remain at a normal rate in conjunction with the level of exercise being performed.
- Rest adequately between workouts. We recommend that beginners do exercise twice a week and increase gradually to 4 or 5 times per week.
- Remove all jewelry, including rings, chains and pins before commencing exercise, in case hurting yourself and others.
- Ideal pool depth is 3’-7” to 4’-8” (110 – 145 cm.). While seated on the AQUA BIKE, the level of the water should be between the waist and the chest of the user.
- The maximum recommended weight capacity for your AQUA BIKE is 260 pounds (118 kg.).
- The machine can be stored or left on the deck or in the pool. We recommend storing the AQUA BIKE out of the water.
SPECIAL RECOMMENDATIONS:
- DO TRY THE WATER TEMPERATURE IN THE POOL BEFORE EXERCISE.
- CHECK AND MAINTAIN THE BASES PERIODICALLY IN ORDER TO AVOID DAMAGES TO THE POOL FLOOR.
- RINSE THE AQUA BIKE WITH FRESH WATER AND TOWEL DRY THEM WHEN TAKEN OUT OF THE POOL, ESP, AFTER USED IN THERMAL OR SALT WATER, AND PERIODICALLY USE A STAINLESS STEEL CLEANING SOLUTION TO HELP PREVENT DEPOSITS OF METALS OR CHEMICALS.
IMPORTANT:
DO NOT USE THE AQUA BIKE FOR EXERCISE OUT OF THE WATER.
THE USE OF THE AQUA BIKE FOR REHABILITATION PURPOSES IS ALLOWED ONLY IF SUPERVISED BY A SPECIALIST.
WARNING : Before commencing with any exercise program, please consult your family physician.
If at any time during exercise you feel faint, dizzy or experience pain, stop and consult your family physician. In the event any of the above mentioned warnings are breached by the consumer, the Manufacturer may use same as a defense to any claim for injuries, damage or loss. The above warnings are in no way intended to limit or modify the consumer’s remedies for breach of warranties pursuant to applicable Federal and State Laws of Regulations. They are being supplied strictly to ensure the safety of the individuals using the project.
- BEFORE YOU BEGIN
IMPORTANT :Read all instructions carefully. Set-up the AQUA BIKE in accordance with the steps in the manual.
IMPORTANT :Layout all parts on the floor. Make sure you have all the parts listed below before beginning assembly. In case of a discrepancy, please do not return the AQUA BIKE to the store where you purchased it, Instead, contact CUSTOMER SERVICE DEPARTMANT at the numbers listed below:
Tel (INDIA) :+91-8178782671/9810101913
E-mail : wetfitindia@gmail.com
Website :www.wetfitaquagym.com
When ordering parts, please use the item number, part number and description listed in the PARTS LIST.
PRE-SET UP CHECK LIST
| ITEM | DESCRIPTION | QUANTITY | REMARK |
| 1 | Main Frame | 1 | |
| 5 | Main Axis | 1 | |
| 6 | Behind Base | 1 | |
| 7 | Propeller | 1 | |
| 9 | Big Washer | 2 | |
| 10 | Canulate Plug | 2 | |
| 11 | Stator | 1 | |
| 12 | Clench Washer | 2 | |
| 13 | Welded Nut | 2 | |
| 14 | Pipe Plug 28 | 2 | |
| 18 | Left Crank | 1 | |
| 19 | Right Crank | 1 | |
| 20 | Seat | 1 | |
| 21 | Wheel | 2 | |
| 22 | Pipe Plug 50 | 2 | |
| 23 | Dust Cap | 2 | |
| 24 | The Gloves | 2 | |
| 25 | Prevailing Torque Type Style Hexagon Nylon Nut M10 | 1 | |
| 28 | Tighten The Screws In The Hexagon Flat End M8x6 | 2 | |
| 29 | Shaft With Ring 17 | 2 | |
| 30 | Washer 10 | 2 | |
| 31 | Bearing 6003ZZ | 2 | |
| 32 | Circlips For Hole 35 | 4 | |
| 33 | Prevailing Torque Type Style Hexagon Nylon Nut M8 | 2 |
- TOOLS :
1 Piece
1 Piece (4 m.m.)
1 Piece (8 m.m.)
WARINING : KEEP THE TOOL AWAY BABIES AND CHILDREN.
- PARTS INFORMATION:
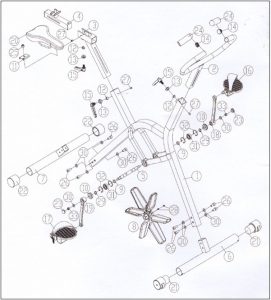
Fig. 1 Exploded – View Assembly Drawing
Note : Most parts are factory pre-assembled
PARTS LIST
| PARTS No. | DESCRIPTION | QUANTITY | REMARK |
| 1 | Main Frame | 1 | |
| 2 | Handle Bar | 1 | |
| 3 | Seat Spiel | 1 | |
| 4 | Seat Tube | 1 | |
| 5 | Main Axis | 1 | |
| 6 | Front Base | 1 | |
| 7 | Behind Base | 1 | |
| 8 | Propeller | 1 | |
| 9 | Big Washer | 2 | |
| 10 | Canulate Plug | 2 | |
| 11 | Stator | 1 | |
| 12 | Clench Washer | 2 | |
| 13 | Welded Nut | 2 | |
| 14 | Pipe Plug 28 | 2 | |
| 15 | Fastening Handle | 4 | |
| 16 | Left Pedal | 1 | |
| 17 | Right Pedal | 1 | |
| 18 | Left Crank | 1 | |
| 19 | Right Crank | 1 | |
| 20 | Seat | 1 | |
| 21 | Wheel | 2 | |
| 22 | Pipe Plug 50 | 2 | |
| 23 | Dust Cap | 2 | |
| 24 | The Gloves | 2 | |
| 25 | Prevailing Torque Type Style Hexagon Nylon Nut M10 | 1 | |
| 26 | Hexagon Socket Head Cap Screws M10x20 | 8 | |
| 28 | Tighten The Screws In The Hexagon Flat End M8x6 | 2 | |
| 29 | Shaft With Ring 17 | 2 | |
| 30 | Washer 10 | 10 | |
| 31 | Bearing 6003ZZ | 2 |
SETTING UP THE AQUA BIKE:

Fig. 1 Fixing The Front Base
STEP 1 :Slide the front base (6) into the main frame (1), Fixed with four washer (30), Four hexagon socket head cap screws M10x20 (26).
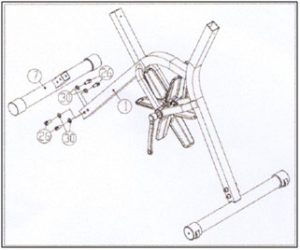
Fig. 2 Fixing The Behind Base
STEP 2 2 :Slide the behind (7) into the main frame (1), Fixed with four washer (30), Four hexagon socket head cap screws M10x20 (26).
Note : There are two holes on the behind base (7), Please let them face to the ground.

Fig. 3Fixing he Handle Bar Tube
STEP 3 : Slide the handle bar tube (2) into the main frame (1), Using one hexagon socket button head screws M6x10 (27), Fixed well with one fastening handle (15).
 Fig. 4 Fixing The Handle Bar
STEP 4 : Insert the seat tube (4) into the seat spile (3), Using one hexagon socket button head screws M6x10 (27), Fix well with one fastening handle (15).
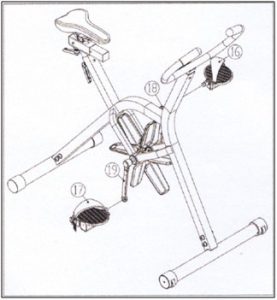
Fig. 5 Fixing he Handle Bar Tube
STEP 5: Insert the seat tube (4) into the seat spile (3), Using one hexagon socket button head screws M6x10 (27), Fix well with one fastening handle (15).

Fig. 6 Fixing The Handle Bar
STEP 6 :Fixed the left pedal (16) onto the left crank (18).
Repeat the same procedure for the other side.
Note:
1. The left pedal (16) and the left Crank (18) are factory pre-assembled.2. The right pedal (17) and the right Crank (19) are factory pre-assembled.

Reviews
There are no reviews yet.